How to lay vinyl plank flooring
date:2017-03-12 / popularity:
How to lay vinyl plank flooring
PRE-INSTALLATION ESSENTIALS
- All BEAUTYFLOORING™ Planks & Tiles must be installed on a level, clean and dry-sub floor. the moisture of the ground should be less than 60%, If the moisture is over 60%, it is unavailable to install, A way to test the moisture is to flatly place a couple of tiles on the ground and see if there is vapor on the back 6-12 hours later.
- It is important to identify the type of sub-floor and comply with the minimum requirements, essentially this standard nominates either concrete or Masonite.
- Turn on HVAC (heating, ventilation, and air conditioning) at Least One Week Prior to Installation Room temperature should be maintained between 65°F and 85°F at least 48 hours prior to installation.
- Level Uneven Surfaces Fill large cracks and voids with cementitious leveling and patching compound. Substrates must be sturdy, sound, and flat within 3⁄16 of an inch within a 10¬foot radius. The substrate should not slope more than 1 inch per 6 feet in any direction
- Remove Floor Moldings Quarter round and wall base should be carefully removed before installation begins. It will be used to conceal the ¼¬inch expansion space once the job is finished.
- Fill Grout Lines Skim coat grout lines on ceramic tile, terrazzo, quarry tile and similar surfaces using cementitious leveling and patching compound.
- Remove Unapproved Substrates including parquet, hardwood, engineered hardwood over concrete, floating floors and sleeper substrates and encapsulate old adhesive old carpet and vinyl adhesives should be scraped up, skim coated or encapsulated.
- Clean up the job site remove all debris, sweep and vacuum the floor. Smooth, nonporous floors should be damp mopped after vacuuming and allowed to dry thoroughly before installing BEAUTYFLOORING ™.
TILE INSTALLATION 18” X 18”
Layout of the Room for Squarely Laid Fields To square the area to be covered, first find the center of one end of the main rectangle. Locate the same point at the other end wall. Snap a chalk line between these points to mark the center line on the floor. Then measure along this center line to find the middle of the room.

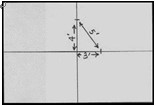
At the center point, mark off a line across the room at exactly right angles to the first line. This may be accomplished by the 3-4-5 triangle method. (See Figure 1, the above picture is the figure 1) Measure 4 feet toward each side wall from the center point. Then, measure 3 feet from the center point along the longer line, and measure exactly 5 feet from the 3-foot mark on the center line to the 4foot mark on the crossline. If the 5-foot measurements do not come out exactly 5 feet, the center crossing lines are not at a true right angle. For large rooms, multiples of the above dimensions may be used to obtain greater accuracy. (6-8-10, 9-12-15, and so on.) Dry-lay a row of tiles from the center line to the side wall to determine the space left for the borders. If the resulting border is too small, move the starting point over a half tile width so that it straddles the center line. Repeat the same procedure lengthwise of the room. (This can readily be figured out from the room dimensions without putting down the tiles if desired.)
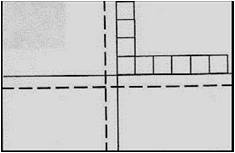
If the center row of tiles straddles one or both center lines, additional guidelines should be snapped on the floor one-half tiles’ width on either one or both center lines, as required. (See Figure 2, the above picture is figure 2)After the border widths have been determined and the center starting lines have been snapped, spread the recommended adhesive on the center lines leaving portions of the lines at center and near each wall uncovered. (See Figure 3, the follow pciture is figure 3) Do not apply more adhesive than can be worked. Follow the adhesive manufacturer’s recommendations. Lay the tiles from the center of the room, working towards the walls as shown. Position tiles without sliding them through the adhesive.
IMPORTANT: All flooring must by rolled with a minimum 100-lb roller after installation. Use a hand roller in areas not reached with a 100-lb. roller.
PLANK INSTALLATION 6” X 36”, 6” X 48”, 9” X 48” and 7.25” X 48”
At the center point, mark off a line across the room at exactly right angles to the first line. This may be accomplished by the 3-4-5 triangle method. (See Figure A, the followed picture is figure A)
Measure 4 feet toward each side wall from the center point. Then, measure 3 feet from the center point along the longer line, and measure exactly 5 feet from the 3-foot mark on the center line to the 4foot mark on the crossline. If the 5-foot measurements do not come out exactly 5 feet, the center crossing lines are not at a true right angle. For large rooms, multiples of the above dimensions may be used to obtain greater accuracy. (6-8-10, 9-12-15, and so on.)
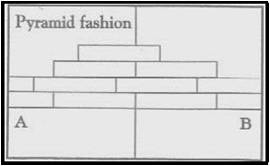
Figure B
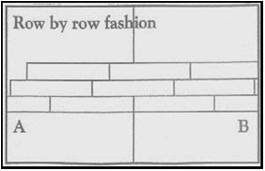
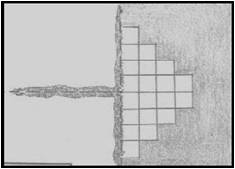
Spread the adhesive over one-half the area and after it is ready, start laying the planks from the right angle formed in the center of the room by center lines. Carefully place the first piece of plank at the junction of the chalk lines. Continue to lay the plank, making sure each plank flush against the chalk line and tight against the adjoining plank. Make sure the plank is well seated into the adhesive paying special attention, to the edges. Lay row by row, or in a pyramid fashion as shown below.
(See Figures B and C)
Lay the material from the center of the room, working towards the walls as shown. It is imperative that the first row is placed precisely and accurately against the reference line as you begin installation. Position planks without sliding them through the adhesive.
IMPORTANT: All flooring must by rolled with a minimum 100-lb roller after installation. Use a hand roller in areas not reached with a 100-lb roller.
edit:BEAUTY FLOORING